控制反转IoC与依赖注入DI
概念
提到Spring首先想到的肯定是Spring的IoC容器了。在了解Spring的用法之前我们必须了解什么是控制反转IoC和依赖注入DI。
控制反转(Inversion of Control)是面向对象编程中的一种设计原则,它建议将不需要的职责移出类,让类专注于核心职责,从而提供松散耦合,提高优化软件程序设计。
简单一点来说,我原来需要一个对象需要自己手动去new,我必须知道哪些类实现了相应的接口,而有了控制反转,我只需要向框架的容器要一个,由它实现装配,对对象组件的控制权也就由代码转移到了外部容器。
控制反转有多种实现方式:
- 依赖注入(Dependency Injection)
- 依赖查找(Dependency Lookup)
其中依赖查找又可以分为依赖拖拽和上下文依赖查找。
依赖注入
我们这里主要来探讨依赖注入,它的基本原则是应用组件不应该负责查找资源或者其他依赖对象,配置对象的工作由IoC容器负责,即组件不做定位查询,只提供常规的Java方法让容器去决定依赖关系。
Spring实现DI有四种方式:构造器注入、setter注入、接口注入和属性注入。接口注入Spring3.x的特性,Spring4.x已经被废弃掉了,我们就着重探讨另外三者。
我们还是在原来的test1项目上进行演示。首先,我们创建一个接口,其名称ITest。
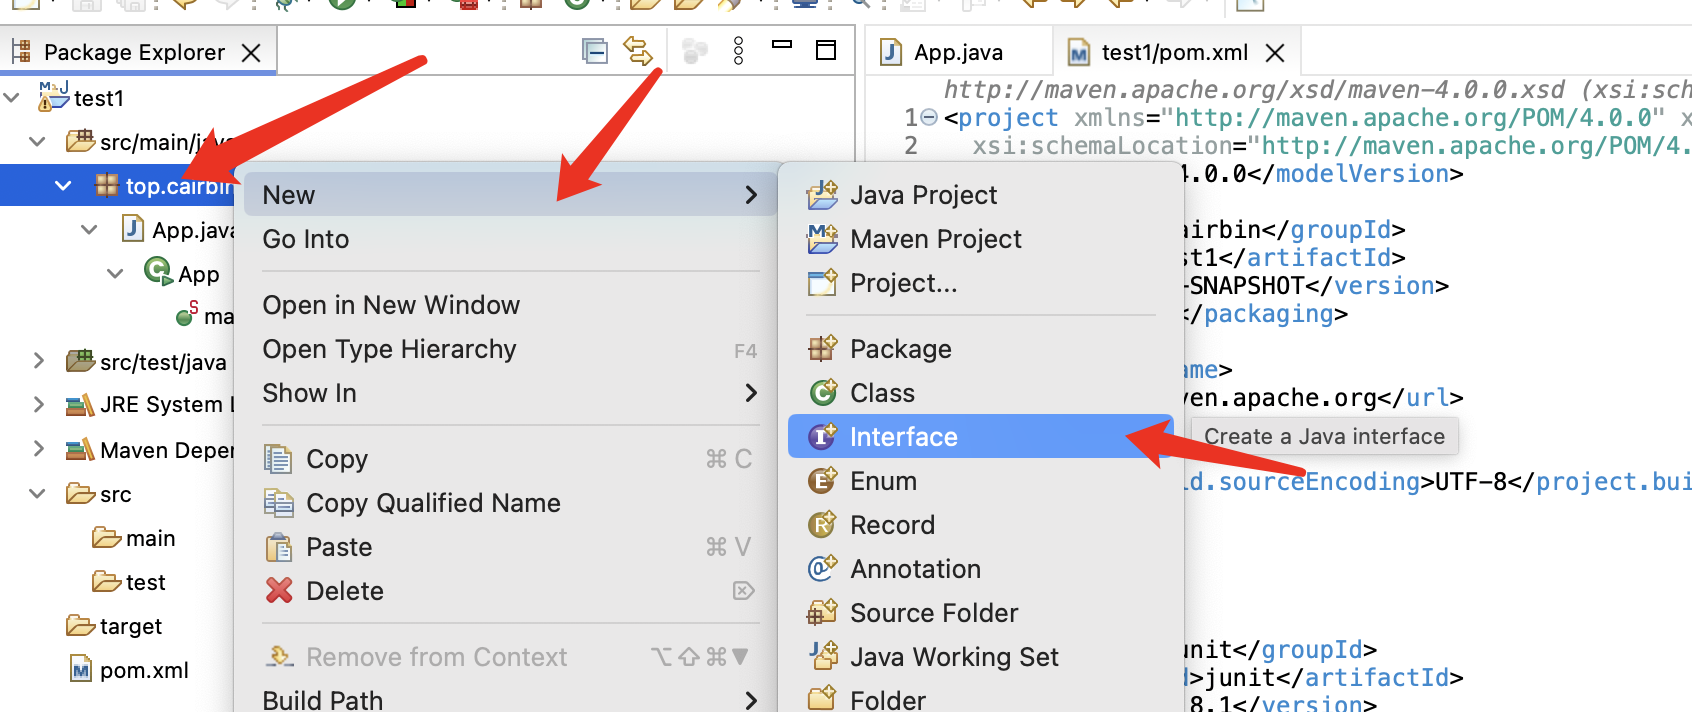
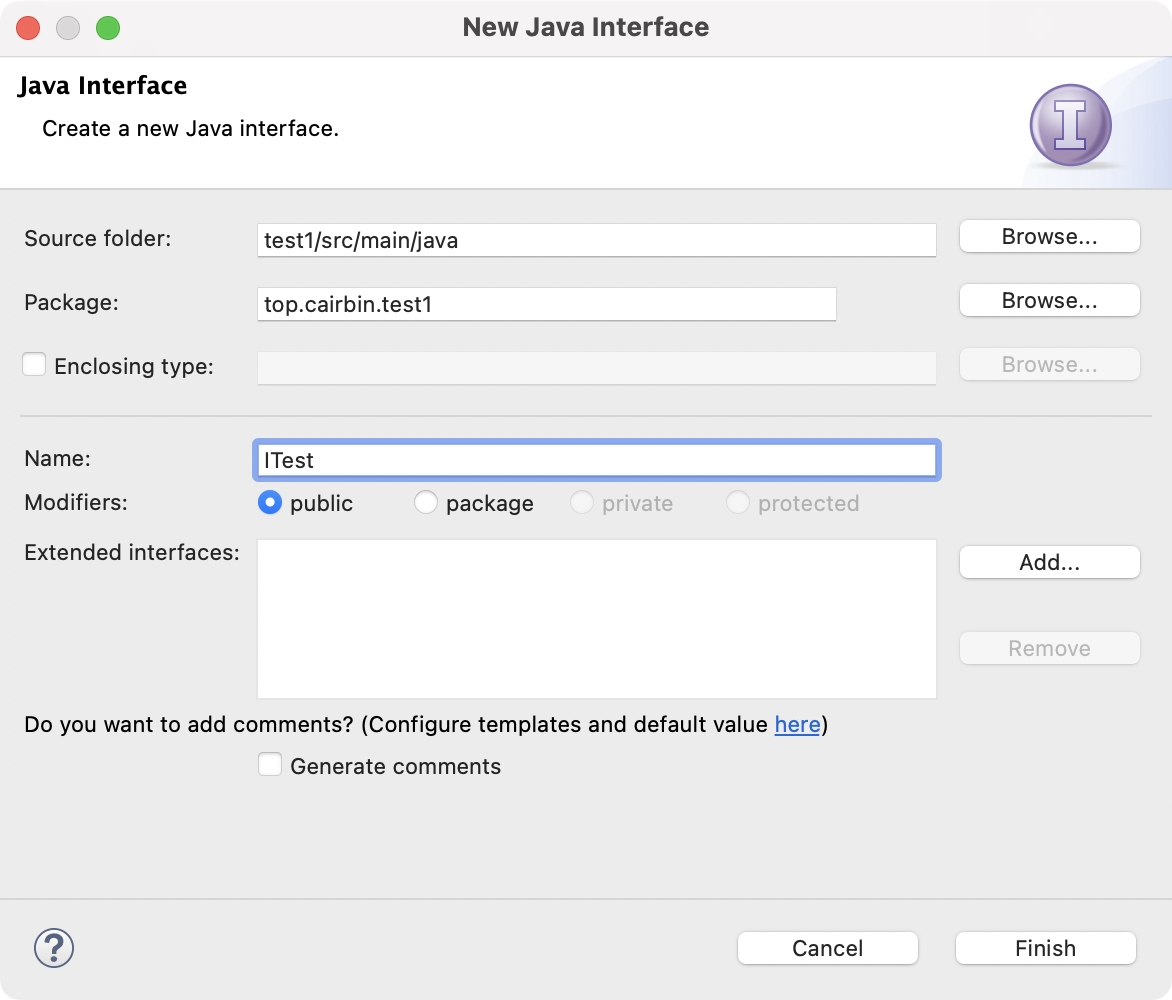
我们在接口中声明一个方法void say()。
package top.cairbin.test1;

public interface ITest {
    void say();
}接下来我们定义一个实现ITest接口的类Test。这里不给出操作图片,请仿照之前的自行创建一个Test.java文件,下文同理。
package top.cairbin.test1;

public class Test implements ITest{
    @Override
    public void say() {
        System.out.println("Hi");
    }
}我们创建一个调用者类User,它需要一个实现了ITest接口的对象。
package top.cairbin.test1;

public class User {
    private ITest test;

    public void testSay() {
        test.say();
    }
}我们尝试在App中去实例化这个对象并调用void testSay()这个方法。
package top.cairbin.test1;

public class App
{
    public static void main( String[] args )
    {
        User user = new User();
        user.testSay();
    }
}接下来运行,发现了一堆报错。这很显然,因为我们没有给定User类中对应ITest类型的属性的实现。

我们接下来尝试使用依赖注入来解决这个报错。
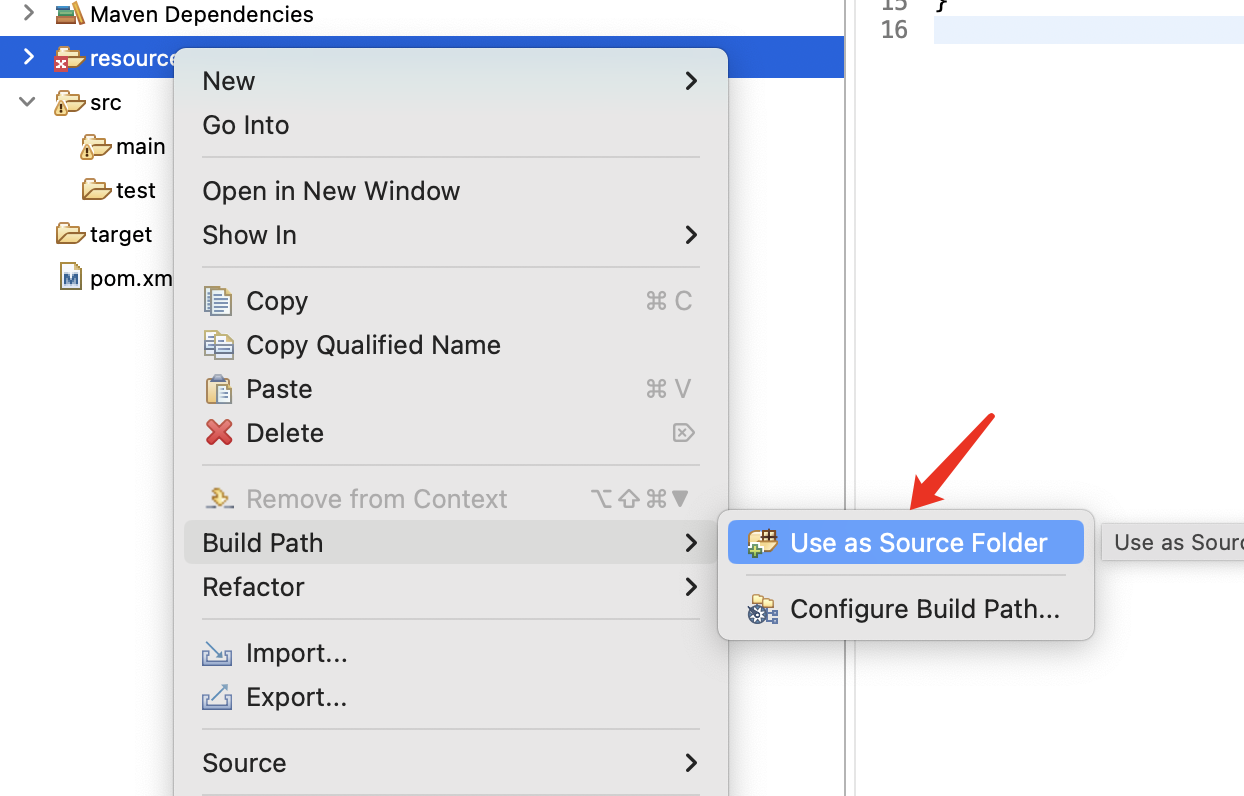
先创建一个与src平级的文件夹,名称叫做resources
然后对这个文件夹右键,点击Build Path里的Use as Source Folder
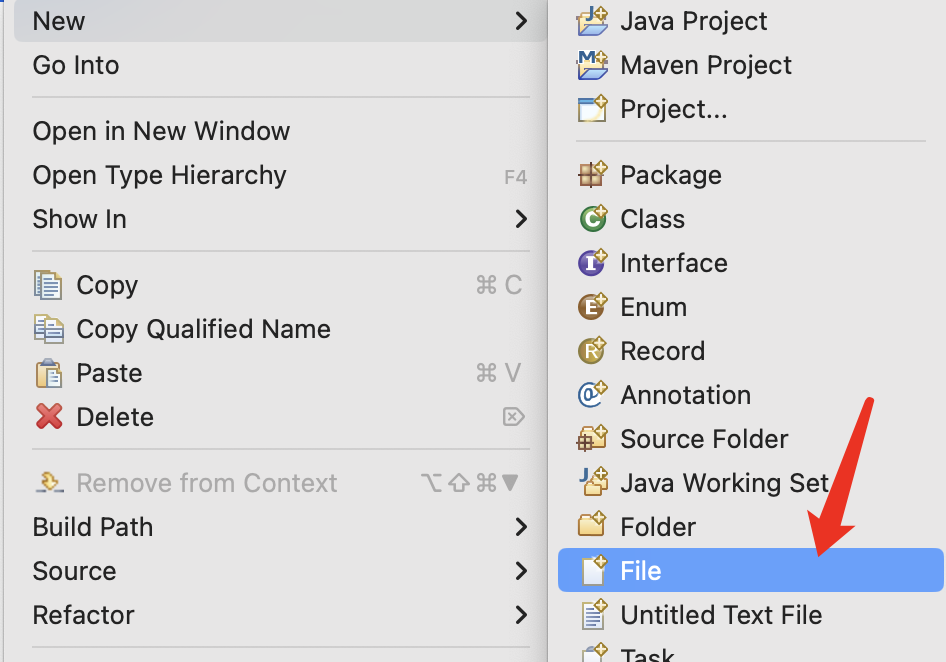
我们要告诉IoC容器谁实现了ITest接口,于是我们在resources目录下创建一个AppCtx.xml文件。
在文件中写入如下内容
<?xml version="1.0" encoding="UTF-8"?>
<beans xmlns="http://www.springframework.org/schema/beans"
       xmlns:xsi="http://www.w3.org/2001/XMLSchema-instance"
       xmlns:context="http://www.springframework.org/schema/context"
       xsi:schemaLocation="http://www.springframework.org/schema/beans
        http://www.springframework.org/schema/beans/spring-beans.xsd http://www.springframework.org/schema/context https://www.springframework.org/schema/context/spring-context.xsd">

    <bean id="test" class="top.cairbin.test1.Test"></bean>

</beans>我们还要告诉Spring去加载这个xml配置文件,于是在App类中(注意新引入的两个包)
package top.cairbin.test1;

import org.springframework.context.ApplicationContext;
import org.springframework.context.support.ClassPathXmlApplicationContext;

public class App
{
    public static void main( String[] args )
    {
        ApplicationContext applicationContext = new ClassPathXmlApplicationContext("AppCtx.xml");
        User user = (User)applicationContext.getBean("user");
        user.testSay();
    }
}
构造器注入
构造器注入是SpringFramework推荐的一种方式,它要求提供有参数的构造方法。
我们对类User进行改造
package top.cairbin.test1;

public class User {
    private final ITest test;

    public User(ITest test) {
        this.test = test;
    }

    public void testSay() {
        test.say();
    }
}然后修改AppCtx.xml,告诉Spring类User构造器对应的参数
<?xml version="1.0" encoding="UTF-8"?>
<beans xmlns="http://www.springframework.org/schema/beans"
       xmlns:xsi="http://www.w3.org/2001/XMLSchema-instance"
       xmlns:context="http://www.springframework.org/schema/context"
       xsi:schemaLocation="http://www.springframework.org/schema/beans
        http://www.springframework.org/schema/beans/spring-beans.xsd http://www.springframework.org/schema/context https://www.springframework.org/schema/context/spring-context.xsd">

    <bean id="test" class="top.cairbin.test1.Test"></bean>
    <bean id="user" class="top.cairbin.test1.User">
        <constructor-arg ref="test"></constructor-arg>
    </bean>

</beans>在这个xml文件中,我们告诉Spring类User构造器所需参数类型。这里的user对应top.cairbin.test1.User,而且与Main函数中的getBean("user")参数一致。
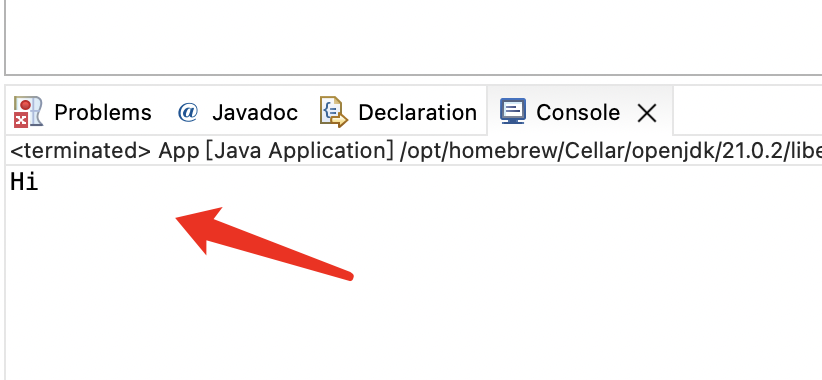
点击运行,发现控制台能够正常输出了
Setter注入
类User内容
package top.cairbin.test1;

public class User {
    private ITest test;

    public void setTest(ITest test) {
        this.test = test;
    }

    public void testSay() {
        test.say();
    }

}AppCtx.xml内容
<?xml version="1.0" encoding="UTF-8"?>
<beans xmlns="http://www.springframework.org/schema/beans"
       xmlns:xsi="http://www.w3.org/2001/XMLSchema-instance"
       xmlns:context="http://www.springframework.org/schema/context"
       xsi:schemaLocation="http://www.springframework.org/schema/beans
        http://www.springframework.org/schema/beans/spring-beans.xsd http://www.springframework.org/schema/context https://www.springframework.org/schema/context/spring-context.xsd">

    <bean id="test" class="top.cairbin.test1.Test"></bean>
    <bean id="user" class="top.cairbin.test1.User">
        <property name="test" ref="test"/>
    </bean>

</beans>
属性注入
属性注入,又或者说是字段注入,实际上并不是新的注入类型,它实际上通过注解实现,底层利用反射机制来设置值。
我们在AppCtx.xml文件中修改内容如下
<?xml version="1.0" encoding="UTF-8"?>
<beans xmlns="http://www.springframework.org/schema/beans"
       xmlns:xsi="http://www.w3.org/2001/XMLSchema-instance"
       xmlns:context="http://www.springframework.org/schema/context"
       xsi:schemaLocation="http://www.springframework.org/schema/beans
        http://www.springframework.org/schema/beans/spring-beans.xsd http://www.springframework.org/schema/context https://www.springframework.org/schema/context/spring-context.xsd">

    <bean id="test" class="top.cairbin.test1.Test"></bean>
    <bean id="user" class="top.cairbin.test1.User" autowire="byName">
    </bean>

</beans>然后修改User类,给属性加一个注解@Autowired并设置一个public void setTest(ITest test)方法。
package top.cairbin.test1;

import org.springframework.beans.factory.annotation.Autowired;

public class User {
    @Autowired
    private ITest test;

    public void setTest(ITest test) {
        this.test = test;
    }

    public void testSay() {
        test.say();
    }
}点击运行按钮我们能看到控制台能够正常输出。
属性注入与自动扫描
我们想扔掉讨厌的setter方法,并且不再写这么麻烦的XML文件,有一个好方法那就是自动扫描。
我们修改AppCtx.xml里开启自动扫描。
<?xml version="1.0" encoding="UTF-8"?>
<beans xmlns="http://www.springframework.org/schema/beans"
       xmlns:xsi="http://www.w3.org/2001/XMLSchema-instance"
       xmlns:context="http://www.springframework.org/schema/context"
       xsi:schemaLocation="http://www.springframework.org/schema/beans
        http://www.springframework.org/schema/beans/spring-beans.xsd http://www.springframework.org/schema/context https://www.springframework.org/schema/context/spring-context.xsd">
    <context:component-scan base-package="top.cairbin.test1" />
</beans>注意这里的base-package属性,为你要扫描的包!!!
然后将Test类注册为Bean,实际上就添加一个@Component注解
@Component
public class Test implements ITest{
    @Override
    public void say() {
        System.out.println("Hi");
    }
}同理,在User类上也添加一个@Component注解,在需要注入的字段上添加@Autowired注解
package top.cairbin.test1;

import org.springframework.beans.factory.annotation.Autowired;
import org.springframework.stereotype.Component;

@Component
public class User {
    @Autowired
    private ITest test;

    public void testSay() {
        test.say();
    }
}保存后,点击运行就能看到控制台输出。
这里对@Component注解进行说明,它就相当于我们在AppCtx.xml里添加了一个<bean></bean>标签,其id为首字母小写的类名,例如类名为TestDi,则对应id就是testDi。
如果你想要自定义这个id,只需要这样写注解即可@Component("testDi")。
属性注入与其它注入混合使用
问题来了,当属性注入和其它注入方式混合使用会怎么样。
在Spring4.3之前,需要添加@Autowired注解在构造函数上;在Spring4.3之后,如果只存在一个构造函数,则不用添加@Autowired,如果存在多个构造函数,则必须指定哪个来注入以来项,即在上面添加@Autowired。
当属性注入与Setter注入同时使用时,例如下方代码:
public class Example {

    @Autowired
    private Bean1 bean1;

    @Autowired
    public void setBean1(Bean1 bean1) {
        this.bean1 = bean1;
    }
}
Spring会优先使用Setter注入!!!
上述只是举例,在实际项目编写不要使用混合的注入方式,因为这会降低代码可读性!!
对比几种DI的方式
构造器注入
对于构造器注入,类的依赖关系在构造器中很明显,所有的依赖项在构造方法中,所以所有的依赖项都第一时间被注入到类中,且无法更改,即构造的对象是不可变的。
为什么Spring推荐这种方式?因为它可以使代码更健壮,可以防止空指针异常。
但是构造器注入也并不完美,它缺乏灵活性,不可能更改对象的依赖关系,在重构代码的时候比较麻烦。甚至有可能产生循环依赖。
Setter注入
Setter注入是一种灵活的方式,但是在多线程环境中可能变得不安全。另外Setter注入需要进行Null检查,否则可能报错,这影响了代码的健壮性。
属性注入
快速方便,与IoC容器耦合,但会带来额外的性能开销和兼容问题,同时也打破了封装这一特性,不利于面向对象编程。同时它也可能存在空指针异常,不利于代码的健壮性。
结束
本文到此结束,看完这一章你对依赖注入应该有了一个大致的了解,但是也应该会有很多疑问。Bean是什么?注解到底帮助我们实现了什么?我们将在下一节来探究这个问题。
